3. 파이토치 소개
페이지 정보
작성자 관리자 댓글 0건 조회 3,966회 작성일 20-02-25 12:17본문
3. 파이토치 소개
Python 기반의 과학 연산 패키지로 다음과 같은 두 집단을 대상으로 합니다:
- NumPy를 대체하고 GPU의 연산력을 사용
- 최대한의 유연성과 속도를 제공하는 딥러닝 연구 플랫폼
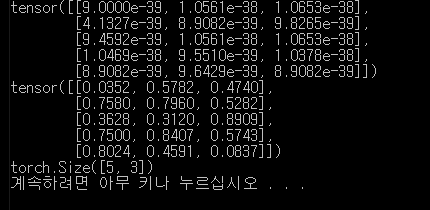
Tensors
Tensor는 NumPy의 ndarray와 유사할뿐만 아니라, GPU를 사용한 연산 가속도 지원합니다.
결과.
연산(Operations)
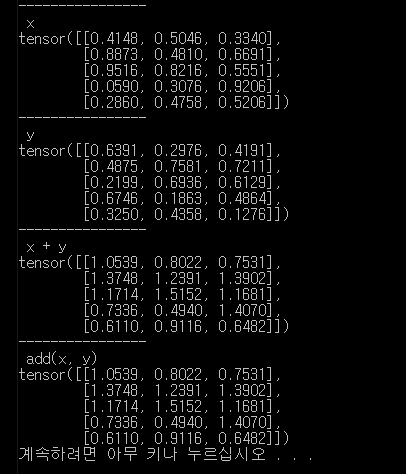
연산을 위한 여러가지 문법을 제공합니다. 다음 예제들을 통해 덧셈 연산을 살펴보겠습니다.
실습. 덧셈
# -*- coding: utf-8 -*-
from __future__ import print_function
import torch
# 무작위로 초기화된 행렬을 생성합니다
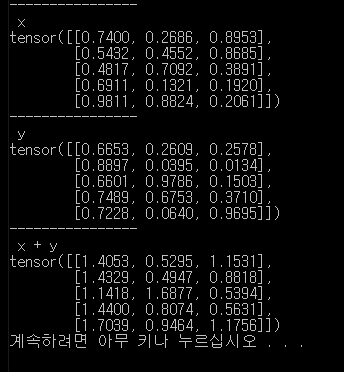
x = torch.rand(5, 3)
print("----------------\n x")
print(x)
y = torch.rand(5, 3)
print("----------------\n y")
print(y)
# 덧셈
print("----------------\n x + y")
print(x + y)
print("----------------\n add(x, y)")
print(torch.add(x, y))
결과.
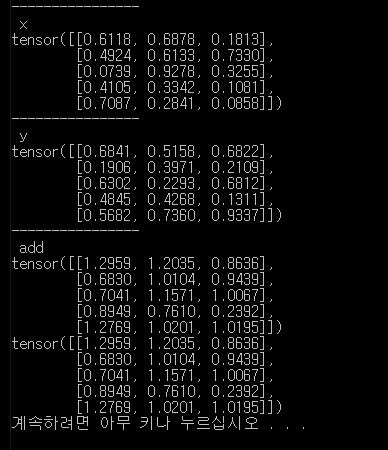
실습.
# -*- coding: utf-8 -*-
from __future__ import print_function
import torch
# 무작위로 초기화된 행렬을 생성합니다
x = torch.rand(5, 3)
print("----------------\n x")
print(x)
y = torch.rand(5, 3)
print("----------------\n y")
print(y)
# 결과 tensor를 인자로 제공
print("----------------\n add")
result = torch.Tensor(5, 3)
torch.add(x, y, out=result)
print(result)
# in-place : y에 x 더하기
# In-place로 tensor의 값을 변경하는 연산은 _ 를 접미사로 갖습니다
y.add_(x)
print(y)
결과.
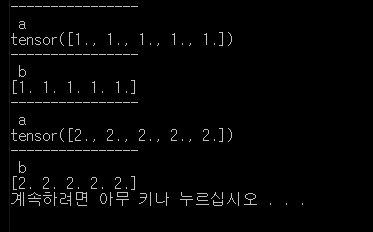
Torch Tensor를 NumPy 배열(array)로 변환하거나, 그 반대로 하는 것은 매우 쉽습니다.
Torch Tensor와 NumPy 배열은 저장 공간을 공유하기 때문에, 하나를 변경하면 다른 하나도 변경됩니다.
Torch Tensor를 NumPy 배열로 변환하기
실습.
# -*- coding: utf-8 -*-
from __future__ import print_function
import torch
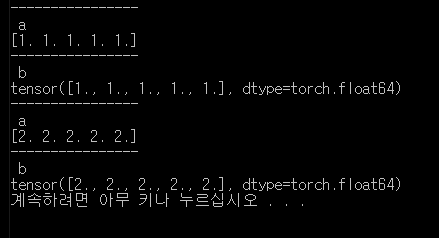
a = torch.ones(5)
print("----------------\n a")
print(a)
b = a.numpy()
print("----------------\n b")
print(b)
a.add_(1)
print("----------------\n a")
print(a)
#numpy 배열의 값이 어떻게 변하는지 확인한다.
print("----------------\n b")
print(b)
결과.
NumPy 배열을 Torch Tensor로 변환하기
np 배열을 변경하면 Torch Tensor의 값도 자동 변경되는 것을 확인해보세요.
실습.
# -*- coding: utf-8 -*-
from __future__ import print_function
import torch
import numpy as np
a = np.ones(5)
print("----------------\n a")
print(a)
b = torch.from_numpy(a)
print("----------------\n b")
print(b)
np.add(a, 1, out=a)
print("----------------\n a")
print(a)
print("----------------\n b")
print(b)
결과.
CharTensor를 제외한 CPU 상의 모든 Tensor는 NumPy로의 변환을 지원하며,
(NumPy에서 Tensor로의) 반대 변환도 지원합니다.
CUDA Tensors
#.cuda 메소드를 사용하여 Tensor를 GPU 상으로 옮길 수 있습니다.
실습.
# -*- coding: utf-8 -*-
from __future__ import print_function
import torch
x = torch.rand(5, 3)
print("----------------\n x")
print(x)
y = torch.rand(5, 3)
print("----------------\n y")
print(y)
# 이 코드는 CUDA가 사용 가능한 환경에서만 실행합니다.
print("----------------\n x + y")
if torch.cuda.is_available():
x = x.cuda()
y = y.cuda()
print(x + y)
else :
print(x + y)
결과.
참고
https://tutorials.pytorch.kr/beginner/pytorch_with_examples.html